Wednesday, February 27, 2013

Pinterest Challenge - Dock Box inspired iphone amp

Since Sherry & Katie's last Pinterest Challege this fall (where I made a chalkboard map), I had been eagerly awaiting the next one!  It's such inspiration looking through everyone's projects!!!

http://createandbabble.com/wp-content/uploads/2013/02/winter-challenge.jpg

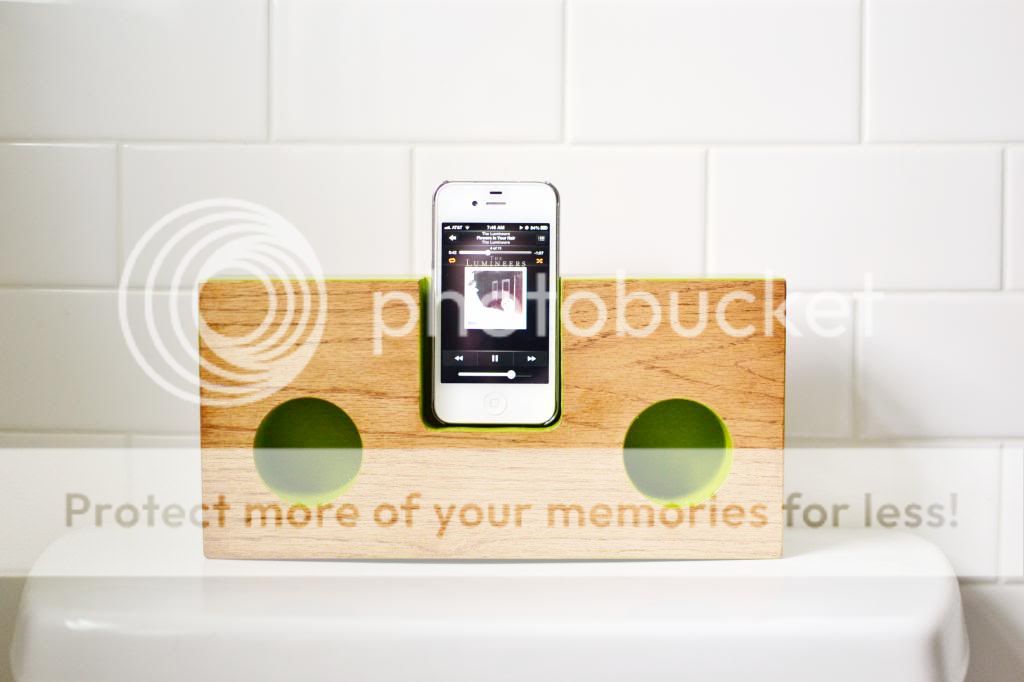
Ok, so this round I had a few ideas: wallpapering the entry way ceiling & tiling a herringbone pattern on the floor in there were a couple of contenders, but ultimately I chose a smaller scale project...a wooden iphone/ipod amplifier.  The thing doesn't use electricity.  The sound from the iphone's built-in speakers gets sent through channels in the wood, & out through holes.  The concept is kind of like how sound gets amplified through the hollow inside of a guitar/violin/etc.  Neato.

Here's the final product...in the place I think we'll use it second most...the loo.   (Once summer hits I'm positive we'll use it on the porch daily.)

It's pretty, completely portable (no need for an outlet) - & best of all it WORKS!


I've seen a few versions on Pinterest from this Etsy Store...and I found plans here. 

The thing was pretty simple & straightforward to make, but you do need some "more than basic" tools to do it.  Luckily I know someone who has a huge workshop that's the envy of the neighborhood - thanks dad!  :)  Let's get to the pics...

That's my dad...he's always willing to help me out with my crazy projects...he's the best.


I can't wait to get home from work & jam.  ;)

Friday, February 22, 2013

Ahh...winter...

I'm generally not a huge fan of winter.  I don't like the cold, I don't like scraping ice of my car windows & having to let the vehicles run for a while before driving them.  I don't like shoveling snow...or even wearing a coat.  I don't like starting my Jeep every few hours in below zero temps just to make sure it will start in the morning when I need it to.

What I do like love though is seeing my guy have fun...and boy does he enjoy playing in the snow! 


Goals for the weekend:
  • Start a new "Pinterest Challenge" project!
  • Finish framing out the book nook in the attic.
  • Measure out the side entry way for (& possibly purchase) new tile.  (I'm thinking a herringbone pattern?!)

Thursday, February 14, 2013

Holy Hearts! Our unfussy Valentine's Day craft.

Grandma, Grady & I whipped up a quick little Valentine's Day project this week.

I had a bunch of leftover canvas (duck cloth) from my Pinterest Challenge chalkboard map, so I put my mom & Grady to work painting it in shades of teal, coral, & red.  I didn't give them much direction - just told my mom to have Grady go for it.

After the paint dried, I doodled different sized hearts on it with Sharpies, cut them out, & strung them up with my sewing machine.  I think they turned out pretty darn cute & add a little love-ly charm & color to the house!

{Make sure to scroll to the bottom to see Grady's Valentines too!  He's so proud of them!}

 {glow-stick light saber card inspired by this}

Hope you all have a wonderful holiday spent with the people you love most!

Don't forget to check out my Etsy store for more Valentine's goodness!  XOXO

Tuesday, February 12, 2013

Book Nook Progress

So, one of the most exciting parts of this attic remodel/finishing project for me is the reading nook/bunk that will be tucked under the eave at the top of the stairs.  My inspiration is loosely based on this picture.  (Of course ours will just be one bed, but you get the idea...)


(from here)

This past week we've been working on jacking up parts of the roof where they were sagging a little, and putting new studs up to frame out the short side walls.  In addition to the bunk, we'll also have two access doors on each side of the attic so we can easily get to all of that storage space.

See the jack in the middle of the photo below...we had to repeat this process for almost all of the studs down the whole side of the attic.  It's slowwwww going, but will be worth it in the end when we have straight and level walls and roof.


A quick shot taken from the inside of my closet looking into the bedroom.


And lastly a shot of what the reading nook looks like now, and a badly Photoshopped image of what I envision it to be.  I can't wait to curl up with a good book...  (Neither can Grady, he already moved a bin of his stuffed animals up here!)


We're inching closer to the finish line...!

Thursday, February 7, 2013

Mini Makeovers: Entry way light, caulk, & painting trim

For years I've had a list of small, inexpensive or free fixes/repairs/tweaks that I'd like to (or need to) make to our house.  Guess how far I've gotten on that list - not very.  For some reason it seems like those tiny, 15 minute projects are the hardest to tackle, even though a lot of times they make a huge impact.  That's about to change friends.

I've challenged myself to cross an average of one item off the list each week.  Some weeks I might finish one, some weeks I might not get to any of them...just so my average is one per week.

So, here's where I'm at after week one, with help from my mom & Grady.

Mini Makeover #1: Ugly entry way light fixture.
I know that gold is back, but this here ain't no pretty gold.  I actually like the globe on the original light, so thought I'd put a quick coat of ORB spray paint on the base to freshen it up a bit.  After taping up some newspaper on the ceiling, the whole shebang took 5 minutes...if that.  Easy peasy.


Mini Makeover #2 & 3: Cracked bathroom trim & hallway/dining trim retouch.
After a too hard door slam in the bathroom a couple of months ago, our trim inside the bathroom got popped away from the wall a little bit.  I had to cut away the old caulking & nail the trim back down, resulting in a gap between the trim & tile.  Before I had a chance to nail the trim back down, the door started rubbing against the wonky trim & peeled some paint off.  So in addition to caulking, we now had to paint the trim, too.  (While we were at it we gave all of the door trim in the hallway & dining room a fresh coat of paint too since there were a few dings here & there.)  Caulk = 1 minute, trim paint in bathroom & hall = 1 hour (with two people working).


Mom & Grady painting the newly repaired trim.  (I wish I looked that cute in my undies!)

Future Mini Makeovers:
paint small strip of wall that was missed in kitchen
paint 1 piece of trim in kitchen
stair railing in basement
wallpaper side entry ceiling
paint exterior doors
paint dining room built-in
threshold by patio door
patch old curtain rod holes
patch cracks in living/dining rooms
repaint living/dining rooms
lay wood floor in hall closet
new smoke alarms by bedrooms
new doorknobs on entry closet & our bedroom door & closets
patch cracks in bathroom & repaint
new shower curtain
art for bathroom
kitchen window treatments
touch up trim in front entry
paint front entry ceiling

I'm sure I'll think of a few other things to do, but this should keep us busy for a while!

Here's to getting stuff done & crossing items off lists!


Thursday, January 31, 2013

Fort-tastic!

We've had a REAL cold couple of weeks here & because of the weather haven't had much of a desire or opportunity to play outside.  (Boo.)  The resulting boredom inspired Grady & I to create a fun little fort for him under our dining room table.  I didn't have a pattern & just kind of winged it with supplies we had at home, but I think it turned out pretty cute!  (PS, Grady likes it too.)

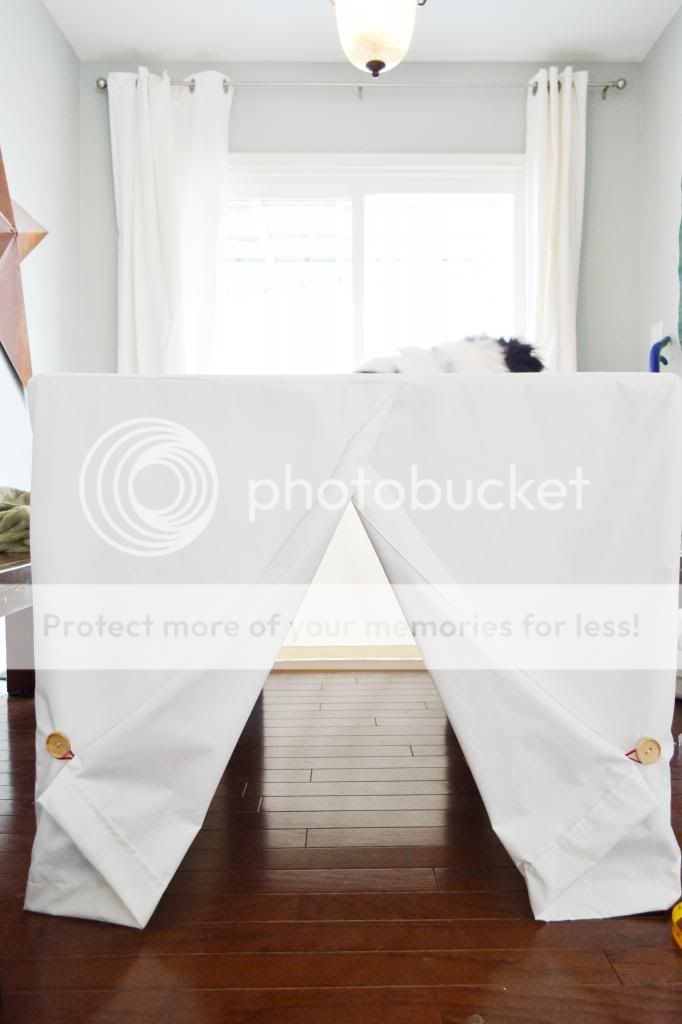
Here's what our dining room table looks like.  It was pretty easy to sew a "slipcover/tablecloth/whatever" for it because it's a simple rectangle.  A little more precision would have to go into making a fort for underneath a round or oval table, but it still wouldn't be hard by any means.


I started by cutting out a rectangle the size of our table top & added 2 inches for seam allowance & some extra wiggle room.  I didn't want it to be difficult to slip on and off.  Then i cut out a very long (18 foot) piece of fabric to wrap around all four sides of the table and overlap a few inches in the front where the door opening would be.  (One looonnnggg piece = less sewing.)  I attached two buttons and loops on either side of the door so Grady would be able to hook the doors open if he wanted to.  Easy peasy & took maybe an hour to sew from start to finish.  (And maybe 10 minutes to string the lights underneath.)


And for good measure, a picture of the outside...don't mind the cat sleeping on top, as I've mentioned before, his nickname is "art cat" & he's ALWAYS in the middle of projects.  He just can. not. resist.  :)


There's something totally magical about forts.  I still remember one specific "pirate ship" fort that my brother & I created when we were little that we were never able to replicate again no matter how many times we tried.  It was epic!  I wish my mom would have taken a picture before we cleaned it up!  :)

Wednesday, January 23, 2013

Insulation Contortionism

I feel like I haven't posted in ages.  Probably because we're just starting to thaw out a little bit here in the frozen tundra.  Temperatures are thhiiiiiiissss close to being a positive number.  A couple of days ago we woke to -14 temps - brrr!  It's -1 today but feels like -24 because of the WIND!  Remind me why I live here again!?!

Anyhoo...dad & I have been focusing on getting the attic insulated & air tight these past couple of weeks.  We thought we had it sealed up pretty good until we went to put the foam board insulation on this weekend & felt a chilly draft coming through.  Ughh.  That meant another trip to Menards to pick up a couple of bags of mica insulation & a few more hours of scooting around under the eaves stuffing it down into cracks.  It was a total pain, but I'm glad it was a windy day & we could feel that draft now as opposed to discovering it after the entire attic is finished.  Sidenote: I was blowing insulation chunks out of my nose all day Sunday...probably should have worn a mask.  You live, you learn.  {Hopefully some of you can learn from me...wear a mask!}

Ok, so here's dad in that eave/crawl space stuffing that mica insulation down.  (Enter the contortionism I mentioned earlier.)  It's hard to tell from this angle, but it's a tight fit getting down in there!  That sawdust/sand looking stuff by his hands is the insulation.  We had to push it down in the corner handful by handful.  Fun stuff!


After we finished that type of insulation down the length of the house, we moved on to the foam board.  (We've just got 2x4s for the roof "trusses", so there isn't much room for insulation between them...the foam board will add another layer of insulation to keep us toasty warm in the winter & cool in the summer.)

Of course the rafters aren't 16" on center (that would have just been to easy), so we had to cut down the foamboard to fit down there.  Not hard at all, just more work.


A couple of days later & we're finished with that portion of the insulation.  My homework is to shop-vac the floor down there & get some of the attic clutter stored away to give us more room to work in the bedroom & on the landing.  Progress is progress, no matter how small!


Oh, I almost forgot!  After we had gotten all of the foam insulation hung, we took a few 1x3s & nailed them down in the corner where the roof meets the floor.  This gives us another layer of protection from any drafts that manage to work their way in, as well as acting as a barrier to keep that loose mica insulation inside the wall/floor where it's supposed to stay & not getting itself all over the items that we'll store in that area.

After I get my behind in gear & organize this space, our next steps are as follows:
  • Rewire lights.
  • Repair/replace old insulation.
  • Frame out closets.
  • Fill gaps under eaves with loose insulation. (finished on west, still need to do east)
  • Foam board insulation on all ceiling surfaces. (finished under west eave, still need to do east eave & center)
  • Frame out under eave storage & built-ins as well as door jamb.
  • Wire for electrical outlets.
  • Drywall (hang, tape, mud, sand).
  • Wood planks on north & south walls.
  • Hang lights.
  • Baseboards, window & door trim.
  • Knock out stairwell door.
  • Paint & install stair railings.
  • Prime & paint walls & ceiling.
  • Closet systems.
  • Finish built-ins.
  • Flooring?
Remember, this is what I envision for the space.

My goal is to get it all completed by the end of April.  I think that's totally doable.  Right???
Blogging tips