Monday, November 19, 2012

Attic Update - Phase 1

In preparation for the winter, dad & I have been working on better insulating the attic.  When we started, we had 4" insulation on both the ceiling & the walls, but certain areas were pulled aside/torn off because of some water issues we had while we were shingling the roof.  What would seem like a quick & easy fix was actually way more complicated.  If you remember from my last attic post, this is what we began with...see the missing pieces & the insulation hanging down under the eave on the left?  Gorgeous right?!  Ok, not quite.


Well, we didn't want to just staple up the old stuff, because we knew that this winter we'd be finishing the attic & also knew that we'd be relocating some lighting & rewiring it at the same time.  Meaning we'd need access behind the insulation to run new wire.  Soooo, before re-hanging the insulation, we had to frame up a few walls (that will be our closets), as well as run the new wire to the new light locations.

OK, so here it is after the first step of framing up those closets.  This photo is taken from the top of the stairs looking toward the future bedroom.  You'll enter through French doors, with my closet to the left & Eli's to the right.  (Look at that crazy pile of baby stuff against the back wall...it's insane how much gear kids need!)
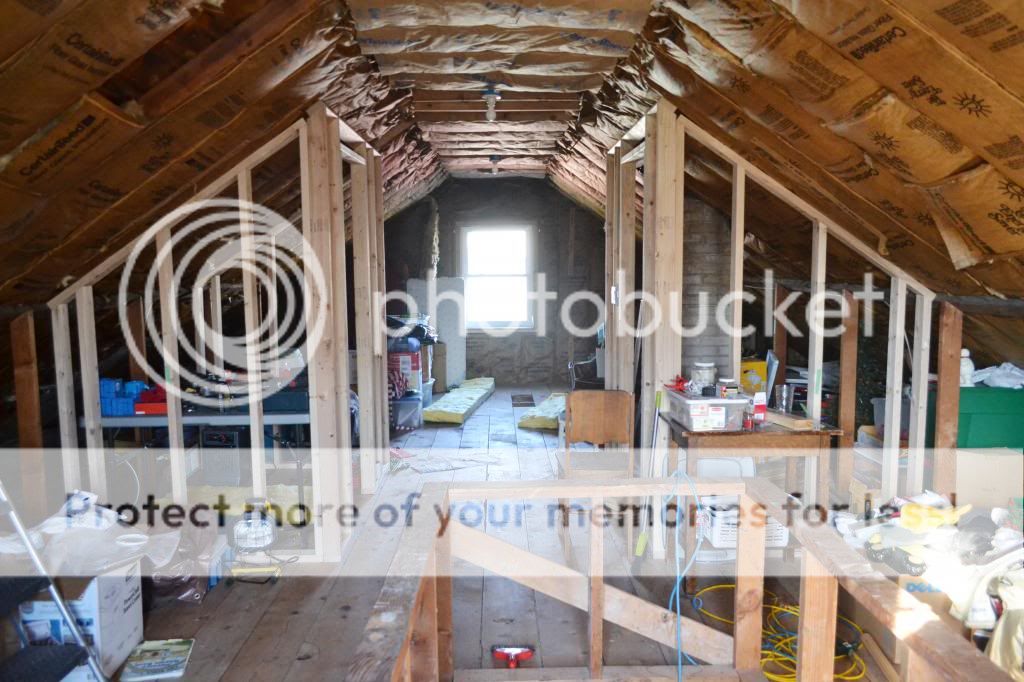

After we framed up the closets, we stapled up all of the old (but still usable) insulation that was hanging down under the eaves, in addition to filling in some gaps where the roof met the main level walls.  It was super fun crawling/scooting around down there.  Let.me.tell.you.


We also had to tear out the middle (flat) portion of the ceiling insulation to level out the rafters (in prep for drywall).  This allowed us to have better access to wiring as well as get a little bit thicker insulation up there than what we had before.


After the wiring was in place, we cut a few rolls of insulation into 4 foot strips to fill in between the new rafters & stapled them up.  (My hand is still sore from the staple gun by the way.)


We've just got a few panels in the middle to hang & we should be all set for phase 2: finishing framing.


Grady was a trooper just hanging out & watching.  This is his incredibly bored "aren't you done yet, mama?  Let's play dragons." face...


Just begging for some tickle-time & some smiles...that's better!


Here's the "un-official" to-do list:
  • Frame up closets.
  • Patch up insulation under eaves.
  • Re-wire lights.
  • Level out ceiling rafters.
  • Insulate peaks.
  • Hang foam board insulation on the roof.
  • Frame out built-ins & walls.
  • Wire electrical outlets.
  • Hang drywall (tape/mud/sand).
  • Prime & paint walls & ceiling.
  • Hang lights.
  • Paint & hang trim.
  • Finish floor.
  • Paint & install new stair railings.
  • Paint & stain stairs.
  • New window (last one in the house!).
  • Install closet systems.
  • Build & hang French doors.
  • Build doors to under eave storage.
  • Tear out door to main level & repair drywall. 

We're aiming to get all of the insulating done (foam board is next) in the next couple of weeks, then take a break until after Christmas.

Slow & steady, but it'll be totally worth it in the end!  :)

Friday, November 16, 2012

My first quilt {ever} is DONE!

Ok, if I remember correctly, we left off at the point where I had sewn together the entire front of the quilt, but hadn't done anything else.  Well, this past week I got my rear in gear, picked up some 50% off 100% cotton batting from Joann, & quilted that bad boy on my little Brother sewing machine.  Had the quilt been an inch longer I'm pretty sure my machine wouldn't have been capable of getting the middle of the quilt done...I pushed that little guy to the max!

Here it is almost done & laid out on the dining room table.  Eli keeps asking me when it'll be finished & we can finally put the sewing machine away...I keep telling him that I need a craft room.


Chaz is my "art cat".  He always finds himself in the middle of my projects...usually with paint on his paws or tail.  Since there was no paint involved in this one, he thought he'd take a quick nap on the quilt AS I was sewing it.  Every time I slid him out of the way he'd sneak his way back up & plop his 18+ pounds in front of me.  Silly cat.


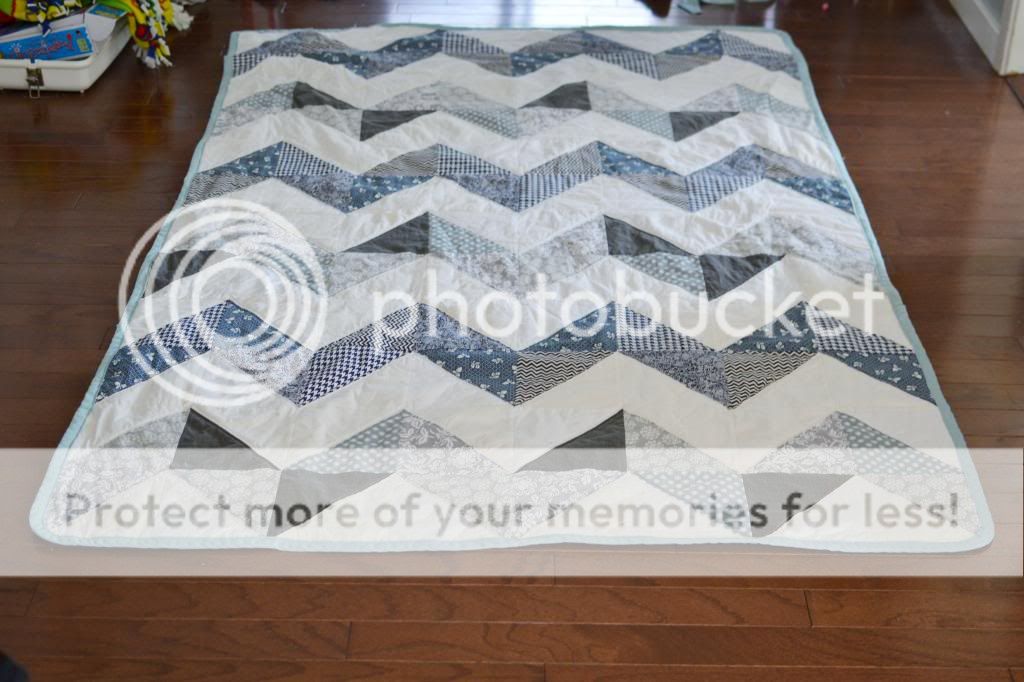
Ok, so here's what it looked like after the "quilting" portion was done & I had trimmed the batting & extra backing off.  I had planned on using & had actually bought some fabric for the back, but ended up finding an old sheet from college that worked perfectly without any seams...sign me up for easy any day!


That was where I was at on Monday night.  The last step was binding the edges of the quilt.  I'm not a huge fan of square corners, so I traced out a curve using a lid & cut off the excess fabric. If I were to do it over, I'd probably do square corners after all...it was TOUGH (impossible?) to get the binding to look nice around the round corners.


I had originally planned on doing a yellow/gold binding, but after looking at all of the pre-packaged binding at Joann I just couldn't find a yellow that was "right" & I wasn't going to attempt to make my own.  Sooo...I settled on a moody gray-blue. I especially love the binding with the stripes on the back!


After pinning & sewing a quick straight stitch all the way around (another thing that if I were to do it over I'd have sewn closer to the inside edge of the binding - you live you learn), I ended up with this finished product!  Perfect for snuggling on the couch on the chilly winter nights to come!


I love the subtle chevron stitching on the back...


I'm pretty darn proud of myself!  :)

Wednesday, November 14, 2012

Letters from Santa & Other Christmas Cheer

I know it still feels a little early to think about Christmas, it's not even Thanksgiving yet, but it'll be here before we know it.

I just finished up the 2012 edition of my "Letter from Santa" last night & as of this afternoon it's officially available on my Etsy store!  Woohoo!  Last year Grady was SO thrilled to get his in the mail...he ended up sleeping with it the first few nights & kept it safe in his nightstand the rest of the year.  Crazy kid!

(This year's edition even has a short note from Rudolph!)


I've also got a handful of other holiday prints in stock with more coming soon!

12 Days of Christmas Print


Fa La La Print


Tis the Season Print


Happy Holidays!

Monday, November 12, 2012

I confess...I'm a copy-cat

If you're on Pinterest, or read design blogs, I'm sure you've heard of Rebekka Seale.  Among other illustrations, she does these amazingly cute house portraits that are personalized with your name, street address, quote, etc.  Here are a few of my favorites...

Although I have NO experience with watercolors, I do have a tote full of artist paints that Grady has been begging to use for a while now.  This weekend we decided to drag 'em out & I thought I'd give a Rebekka Seale style house portrait a go.  It's definitely not anywhere near her level, but for my first attempt I think it turned out pretty darn cute!

First I printed out a few of her houses that had similar characteristics as mine, along with a picture of the front of my house.  Oh, I also printed out our last name, address, & a short quote in a font I liked in case I wanted to add that to the bottom.  Then I went to Joann & bought a small pad of watercolor/acrylic paper (4x6) in their dollar section.  (Grady bought a small bird house, also from the dollar section, that he was going to paint.)


I watered down my paint & layered it on in the rough shape of our house.  I just eyeballed it & didn't sketch it out at all beforehand & I certainly didn't try to get it perfect.  My house is just a box with no crazy angles, so it was pretty simple!


After getting the base painted, I filled in the windows, door, steps, trim, etc.  I also added random lines on the roof & walls for the shingles & shake siding.


Next, I focused on the details...the mortar lines on the chimney, adding a little depth to the windows & doors, etc.  I just kept tweaking it until I was happy with the look.


I didn't have much room below the house for text, so I opted to keep in simple with "Home".


Then I painted an old garage sale frame yellow & called her complete!


Like I said before...it's certainly not perfect, or nearly as cute as Rebekka's portraits, but it does add a little cheer to the kitchen & makes me smile when I see it.  All for a couple of hours of time & less than a buck!

Monday, November 5, 2012

Mini-Makeover: Bookshelves

We had a weekend full of smallish projects.  On Saturday, dad & I spent a few hours in the attic insulating.  Although the attic is completely unfinished, the previous owners did have it insulated fairly well.  There were just a few areas where we chose to add some extra insulation - mainly the line where the roof meets the main level walls.  Which means that it was 4 itchy hours of sliding around on our backs under the eaves.  Fun stuff!  The good news is that we're now toasty warm, framed up, & ready to wire!

The next job I tackled was a lot less physical & only took about 20 minutes!  Grady has a built-in bookcase in his room that was being completely overrun with his books.  I had tried a few months ago to arrange them by color, but that method just wasn't working for several reasons.  I'm all about organizing by color (my closet is color coded), but the boys in my life sadly are not!  Here's a shot of what the shelves looked like before I started - yikes!


Excuse the photo quality...Grady's room is SO dark at all times of the day & this photo was taken at night to top it off.  Anywhoo, you get the idea!

I started by taking every single item off the shelves & organizing them by size on the floor.  I also eliminated all of the books on the top shelf as they're chapter books that will be too old for him for several years anyway.  Might as well free up that space for something that he actually uses/can enjoy, right?  There was also a stack of 10 or so books that were either repeats, or that he & I didn't really care for that will either go to his cousin or in the garage sale pile.


 After sorting everything by size, I just loaded it all back onto the shelves in random stacks.  It's not perfect, but it doesn't hurt your eyes to look at either!  


P.S. The folding ruler in the above shot is actually what we use as Grady's growth chart.  We just unfold it, have him stand in front, & mark off how tall he is with a Sharpie right on the ruler.  It extends to 6.5 feet, so it should last at least through junior high!  I love how it's simple, not obnoxious, & is completely portable!


Isn't it insane how just taking out the chapter books & a small stack of books that we don't read freed up SO much space (for more books!)???

Thursday, November 1, 2012

Lumberjacks & Jack-O-Lanterns

How can you not love Halloween?  Especially if you're a parent.  It's seriously the best thing ever watching your child/children have such a great time dressing up, getting free candy (a LOT of it), & seeing friends in their costumes...

Last night was perfect out.  A little chilly, but not so cold that you had to cover up those spooky costumes with winter coats.  I remember a couple of Halloweens when I was little that there was even snow on the ground...brr!

Our little lumberjack had a blast!  Dad had to work late (life of a college coach...sigh), so I took off work early so we could get our costumes on, pick up grandma, & head over to the ECFE Halloween party for a little while before trick-or-treating.  We had fun with the crafts, but I think Grady will probably be too old to attend next year...he just wanted to get to the candy part!


Those little teeth peeking out of the beard kill me...haha!


He's a natural!  Great form, kid!


After the party, we walked a couple of streets in our neighborhood & even found Santa's house...as in the Santa that comes to our mall each year!  He totally commits to the role...year round, real beard & long white hair & all!  It was hilarious to hear all of the kids yelling, "thanks, Santa!" after they got their candy...I think they wanted to make sure he knew that they had good manners!  :)  (Side note: Notice Santa's tattoo...he usually shows up to his mall duty in his biker jacket...did you guys know that Santa rides a Harley?!)


So stoic & manly!


We hope you all had as much fun as we did last night!  :)
Blogging tips