Showing posts with label crafts. Show all posts

Thursday, March 28, 2013

Scrap wood art project

Grady's been home sick with a temp & cold all week.  (Another reason I'm ready for this winter to be over.)  As a parent, I feel awful when Grady isn't feeling well...but at the same time, it's kind of nice cuddling on the couch & spending quiet time together at home.  :)

We were looking for something to do to pass the time, & Grady suggested painting.  The kid LOVES to paint.  I didn't have any canvas board or nice paper, but found some old floor boards in the attic that we had just removed in order to take out an old fan & replaced with new plywood.  Use what you have!

Grady is in Easter mode, so he wanted to paint a bunny.  Correction, he wanted to paint the board, & wanted me to paint a bunny on it for him.  Here's what we came up with...the bunny was inspired by something we found on Google images.

The little artist "orange-washed" his board, then wanted to paint over it with pink, & leave a little bit of orange peeking through.  (PS, you can see the little slit of orange peeking through by the bunny's left ear - on your right.  Funny kid.)  His words, not mine.  Hehe.


After he was done with his orange & pink & white layers, I traced out a bunny & painted it with watered down craft paint.


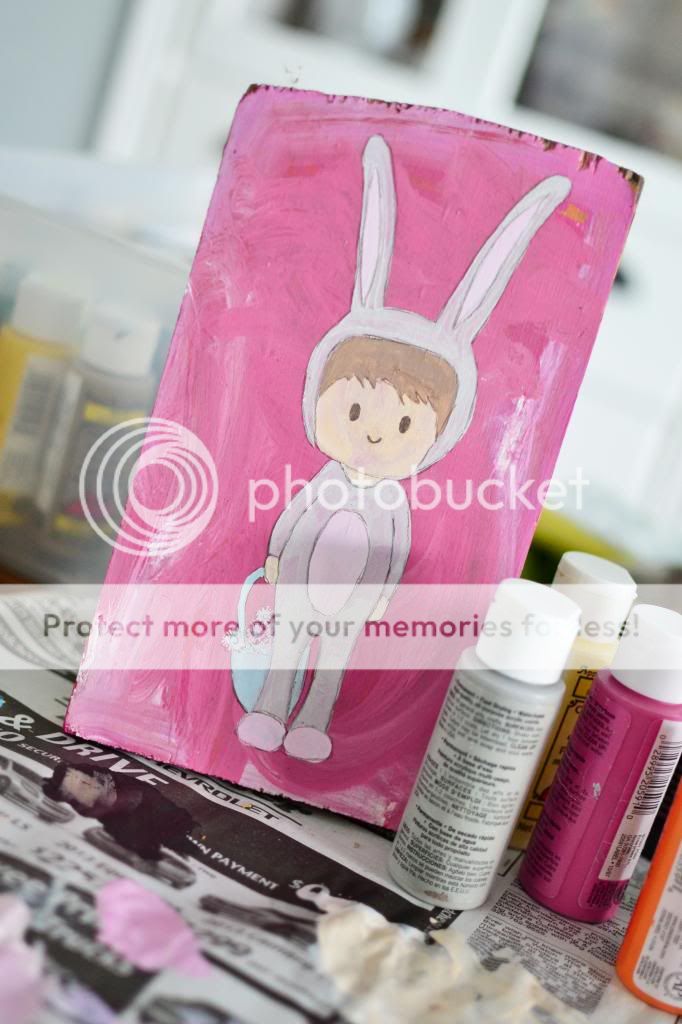
It was looking a tad Precious Moments-y, so I tweaked the nose a bit & turned it into a rabbit nose.  I think it turned out pretty darn cute for being a collaborative piece of art by a 3 year old & a 30 year old!  The most important thing was that we had fun doing it together...


I wasn't sure at first what I wanted to paint on mine, so I started by cleaning off the surface & whitewashing it.  After a few minutes online I had found a quote from "Fantastic Mr. Fox" that I thought was cute & googled "fox illustration" to find an image to inspire me.

The quote reads: 

"We're all different.  Especially him.  But there's something kind of fantastic about that, isn't there?".


After whitewashing, I sketched out the quote & fox using my Burnt Umber colored watercolor pencil.  Back when I was doing mural painting we used these pencils all the time to sketch on the walls.  The color is perfect for blending in to almost any art, and any mistakes can just be wiped away with water!  You can find them at most art supply/craft stores.


I was trying to be imperfect & quick with this art.  I didn't want to commit too much time to it & knew that Grady's attention span wouldn't last that long anyway.  I quickly dry-brushed some color on the fox & painted the lettering with some watered down brown paint.  After I finished it was looking a little bold for my liking, so I whitewashed it again, right over what I had just painted.  I'm not sure where it'll go yet...probably in Grady's room?


Thursday, February 14, 2013

Holy Hearts! Our unfussy Valentine's Day craft.

Grandma, Grady & I whipped up a quick little Valentine's Day project this week.

I had a bunch of leftover canvas (duck cloth) from my Pinterest Challenge chalkboard map, so I put my mom & Grady to work painting it in shades of teal, coral, & red.  I didn't give them much direction - just told my mom to have Grady go for it.

After the paint dried, I doodled different sized hearts on it with Sharpies, cut them out, & strung them up with my sewing machine.  I think they turned out pretty darn cute & add a little love-ly charm & color to the house!

{Make sure to scroll to the bottom to see Grady's Valentines too!  He's so proud of them!}

 {glow-stick light saber card inspired by this}

Hope you all have a wonderful holiday spent with the people you love most!

Don't forget to check out my Etsy store for more Valentine's goodness!  XOXO

Thursday, January 31, 2013

Fort-tastic!

We've had a REAL cold couple of weeks here & because of the weather haven't had much of a desire or opportunity to play outside.  (Boo.)  The resulting boredom inspired Grady & I to create a fun little fort for him under our dining room table.  I didn't have a pattern & just kind of winged it with supplies we had at home, but I think it turned out pretty cute!  (PS, Grady likes it too.)

Here's what our dining room table looks like.  It was pretty easy to sew a "slipcover/tablecloth/whatever" for it because it's a simple rectangle.  A little more precision would have to go into making a fort for underneath a round or oval table, but it still wouldn't be hard by any means.


I started by cutting out a rectangle the size of our table top & added 2 inches for seam allowance & some extra wiggle room.  I didn't want it to be difficult to slip on and off.  Then i cut out a very long (18 foot) piece of fabric to wrap around all four sides of the table and overlap a few inches in the front where the door opening would be.  (One looonnnggg piece = less sewing.)  I attached two buttons and loops on either side of the door so Grady would be able to hook the doors open if he wanted to.  Easy peasy & took maybe an hour to sew from start to finish.  (And maybe 10 minutes to string the lights underneath.)


And for good measure, a picture of the outside...don't mind the cat sleeping on top, as I've mentioned before, his nickname is "art cat" & he's ALWAYS in the middle of projects.  He just can. not. resist.  :)


There's something totally magical about forts.  I still remember one specific "pirate ship" fort that my brother & I created when we were little that we were never able to replicate again no matter how many times we tried.  It was epic!  I wish my mom would have taken a picture before we cleaned it up!  :)

Thursday, January 3, 2013

Photo Garland

Right before Christmas I printed out a bunch of 4x6 pictures from our photo shoot.  I obviously didn't want 25 framed pictures up in our house, but I wanted to display some of our favorites...& not commit to anything permanent (or expensive). 

Grady had just gotten a present that had a green ribbon tied around it, which made me wonder if I could do some type of garland, but with pictures pinned to it.  I started collecting a few random supplies from around the house - some white string & gray yarn as well as a few felt flowers I had left over from the wreath project.

I ended up hanging it with paper tape from my tin mirror in the living room.  I wasn't sure how it was going to turn out, but I kind of love it!  Best of all - it was free other than the cost of the prints!  :)


I hope everyone had a safe & happy New Year!  We were stuck in Omaha at my in-laws' house, too sick to travel.  It seems like every kind of icky stuff is going around.  We're finally feeling a little bit better today, so hopefully we can get some stuff accomplished this weekend.  The most important of which is getting Grady's room organized again after bringing home all of his Christmas gifts - ughh!  There's just too much!

Wednesday, October 24, 2012

Zig Zag quilt update

I finished the front of the quilt this week - woohoo!  I was a little worried about how it was all going to piece together, but everything actually lined up quite well!  I think it's a tad longer on the right side, but I don't think it's real noticeable...and you surely won't be able to tell when it's on a bed.

Next up, figuring out what the heck I'm going to do for the back of it, getting some batting, quilting the thing, and finally binding it.  Not sure what I'm doing at all, but how bad can it be, right?  (Famous last words...)


Update: Here's the finished quilt!

Blogging tips